Tuxwiz
Build your ultimate retro game station or power your own home server with Tuxwiz. The full Tuxwiz edition comes loaded with classic games and a lightweight IceWM desktop for a fun and nostalgic Linux experience. Tuxwiz Mini is a super lightweight version that makes a perfect base for a home server. Both editions are based on Debian, with a stable release for reliability and a rolling release based on Sid for cutting-edge versatility. Whether you want to strengthen your Linux skills or enjoy retro gaming, Tuxwiz makes exploring and using Linux simple and enjoyable.

Become a Wizard!
Tuxwiz is the perfect environment to dive deep into the world of Linux. Well preconfigured, you can just use it as it is. But the fun starts when you tweak it to your own likes and needs. Tuxwiz is the distribution I mostly use for my Linux Videos and is also the name of my YouTube channel. If you are planning to become a 'real Linux Hacker' this is definitly the distribution of choice (or Slackware, of course).
Adding new Applications
You can install new apps as you know it already using the graphical Synaptic package manager or, as you are an experienced space traveler, you probably prefer the command line.
After installation of, let's say, Thunderbird, you might have noticed that it does not appear in the menu directly.
This is because the menu is generated dynamically on every login, using a little helper called xdgmenumaker.
It does a wonderful job, looking at all that .desktop files and the related icons of your preferred icon theme and puts it all together into a file called ~/.icewm/menu
Autostart during login is done via a little script which can be found at ~/.icewm/startup - feel free to take a look at it e.g. using cat ~/.icewm/startup
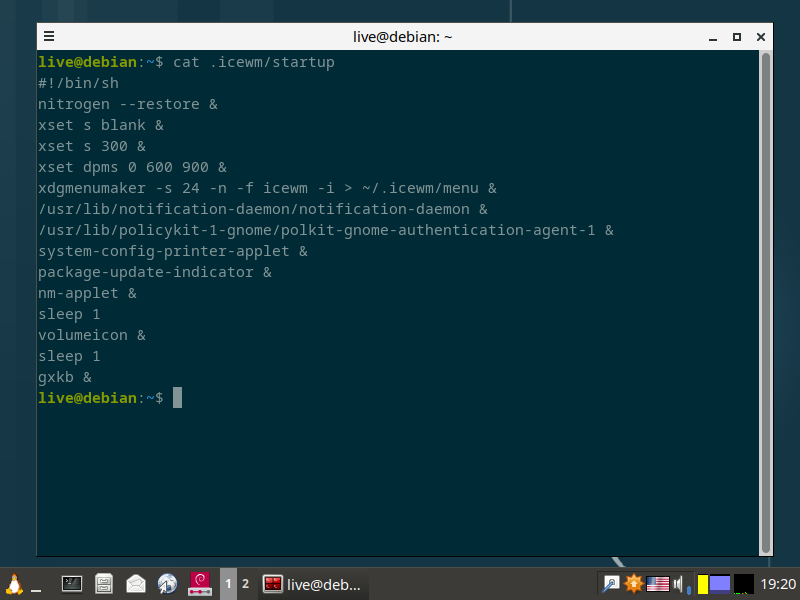
You will see a line which looks something like this:
xdgmenumaker -s 24 -n -f icewm -i > ~/.icewm/menu &You can just copy and paste it any time after a software installation and your menu will get updated immediately.
Make it your own
Tuxwiz comes with a well-selected and hand-crafted design.
If you are happy with it, fine. But then you are missing all the fun because you can completely customize the look of your system.
There are several different aspects which can be adjusted. Let's start with the easy ones:
IceWM Themes
The window manager is the engine that is responsible for drawing all the applications on your screen. The panel and the window decoration are it's main elements. There are thousands of designs available for IceWM which can be found e.g. on box-look.org. Just download the one you like and extract the theme to ~/.icewm/themes. Afterward, choose Settings / Themes in the main menu and select one of your choice. Numerous IceWM themes are already included in Tuxwiz.
Wallpapers
One of the first things most astronauts do is personalize their starship by setting a wallpaper. To make this easy, Tuxwiz includes a small tool called Azote, which you can find in the Accessories menu.
Azote might feel a little tricky at first, but once you get the hang of it, it becomes very handy. The application works by browsing directories for images that can be set as wallpapers. Tuxwiz comes with a large collection of wallpapers, located in /usr/share/backgrounds. If you're looking for even more options, Deviantart is a great place to explore.
Setting a Wallpaper
- Open Azote and select the wallpaper you'd like to use.
- Click on the display where you want it to appear.
- Set the mode to Fill for the best results.
- Click the ✓ button to apply your new wallpaper.
How It Works Behind the Scenes
Under the hood, Azote simply generates and applies a configuration file for feh (a lightweight image viewer). This file is saved in your home directory as ~/.fehbg and looks something like this:
#!/bin/sh
feh --no-fehbg --bg-fill '/usr/share/backgrounds/TuxWiz.jpg'
This script is automatically executed at startup because it is included in your ~/.icewm/startup file:
#!/bin/sh
~/.fehbg &
...
This ensures your chosen wallpaper is restored every time you log in.
Dark Theme
Some fellow space travelers prefer it dark. You can switch to a dark theme by editing the file /etc/X11/Xsession.d/100-qtstyle with sudo and changing Adwaita to Adwaita-dark.
For GTK+ applications, you can modify the files ~/.config/gtk-3.0/settings.ini and change Adwaita to Adwaita-dark as well.
After a relogin, the applications should be using the dark theme.
Screen Resolution
The screen resolution can easily be changed using Settings / ARandR. Right-Click on the monitor, choose the resolution you like, and hit Apply.
You can also save your layout, but to apply it on login, additional work is required.
Once you have saved your preferred layout, a file is created called like ~/.screenlayout/mylayout.sh, depending on how you have named it and the location you have chosen to save it to.
You can take a look at it with cat:
cat ~/.screenlayout/mylayout.sh
To launch the script on login, add it to your ~/.icewm/startup script, directly after #!/bin/bash
DPI
You got one of this modern computers with high resolution displays and everything looks tiny. Don't worry. On a system utilizing the IceWM window manager, you can change this by adjusting the DPI value.
Open a Terminal and enter the following command:
sudo nano /etc/lightdm/lightdm-gtk-greeter.confThis will open an easy editor. Scroll down to the end until you see the #xft-dpi. Remove the # sign in front and add a value, e.g. 120
xft-dpi=120It should look like this:

Now save the changes using Ctrl+O and exit the editor with Ctrl+X.
Another file has to be edited. Open nano again, but first make sure you are in your home directory using cd:
cd
nano .XresourcesHint: you can also edit the file directly like this: nano ~/.Xresources
Add the following line to the file:
Xft.dpi: 120
Save with Ctrl+O and exit the editor with Ctrl+X. Now log out and login again. Do you notice the difference? If it's still too small, repeat the steps above, but increase the value from 120 to e.g. 144. Find out what fits with you or use a DPI-Calculator.
Disable Workspaces
Most window managers and Desktop Environments on Linux offer a so-called Workspaces functionality. It provides virtual desktops, so you can e.g. place all your Internet apps on one workspace and the rest on another. You can switch between workspaces by clicking the numbers in the taskbar.
If you don't need this functionality, it can be disabled as follows. Open a terminal and paste the following script as one (not line-by-line):
cat <<EOF >> ~/.icewm/preferences
TaskBarShowWorkspaces=0
WorkspaceNames=" 1 "
EOF
Not restart IceWM by opening the menu and clicking on Logout / Restart IceWM. You will notice that the little numbers in the Taskbar, representing the workspaces, have disappeared.
Seamonkey - Internet Application Suite
The default browser included in our IceWM Spins is Falkon. It is a relatively lightweight, still fully functional web browser. Yet, for some old hardware it might be too bloated and the Seamonkey Internet Application Suite might be a valid alternative. Besides a Webbrowser, Seamonkey can be used as an email-client, a newsreader, for IRC chats and more. For Debian based systems, there is a 3rd Party Repository available called Ubuntuzilla. To ease up the installation procedure, simply copy the content of our Ubuntuzilla Setup Helper into your terminal and afterward run the following commands to install the application:
sudo apt update && sudo sudo apt install seamonkey-mozilla-buildSeamonkey is available in English by default, but can be easily extended using Language Packs. Simply download the relevant .xpi file and open it with SeaMonkey to install the extension. The language can then be changed in the preferences: Edit / Preferences / Appearance / User Interface Language.

If you want to use an AdBlocker with SeaMonkey (recommended), you can try the latest release of the uBlock Origin for Firefox Legacy Browsers.
To make Seamonkey the system-wide default web browser, you can run the following command:
sudo update-alternatives --install /usr/bin/x-www-browser x-www-browser /usr/bin/seamonkey 100Become a Galaxy Guardian
My videos and the Spacefun distribution turn complex Linux topics into simple, enjoyable learning that benefits both beginners and pros alike. Join a growing community that’s not just learning Linux but actively shaping its future together. Yet, quality, independent Free Software content doesn’t create itself. Your support helps keep it alive and growing. Plus, you get access to the latest Spacefun versions, fresh tutorials, make new friends, and become part of a community that truly cares.
For just CHF 15/month, you can join the league of Galaxy Guardians, our special forces supporting and protecting this journey.
Set up your monthly donation, then contact me to have your name and logo featured among the Guardians.
Daily Hit Counter
Our Planet
The Spacefun Community is a friendly place where like-minded people meet and chat about Free Software and our beloved Linux operating system. No matter if you are a space cadet in training or a veteran, we offer a place where you don't have to be shy to ask questions. You can find us on Telegram via XMPP and Delta Chat. We mostly speak German, but English is also welcome.
My video tutorials will help you to dive deeper into the magical Linux universe.
Like and Subscribe on YouTube!